Writing macros
This chapter provides the necessary information to write macros in sardana. The complete macro API can be found here.
What is a macro
A macro in sardana describes a specific procedure that can be executed at any time. Macros run inside the sardana sandbox. This simply means that each time you run a macro, the system makes sure the necessary environment for it to run safely is ready.
Macros can only be written in Python. A macro can be a function or a
class. In order for a function to be recognized as a macro, it
must be properly labeled as a macro (this is done with a special
macro decorator. Details are explaind below). In the same way, for a
class to be recognized as a macro, it must inherit from a
Macro super-class. Macros are case sensitive. This means that
helloworld is a different macro than HelloWorld.
The choice between writing a macro function or a macro class depends not only on the type of procedure you want to write, but also (and probably, most importantly) on the type of programming you are most confortable with.
If you are a scientist, and you have a programming background on a functional language (like fortran, matlab, SPEC), then you might prefer to write macro functions. Computer scientists (young ones, specially), on the other hand, often have a background on object oriented languages (Java, C++, C#) and feel more confortable writing macro classes.
Classes tend to scale better with the size of a program or library. By writing a macro class you can benefit from all advantages of object-oriented programming. This means that, in theory:
it would reduce the amount of code you need to write
reduce the complexity of your code by dividing it into small, reasonably independent and re-usable components, that talk to each other using only well-defined interfaces
Improvement of productivity by using easily adaptable pre-defined software components
In practice, however, and specially if you don’t come from a programming background, writing classes requires a different way of thinking. It will also require you to extend your knowledge in terms of syntax of a programming language.
Furthermore, most tasks you will probably need to execute as macros, often don’t fit the class paradigm that object-oriented languages offer. If you are writing a sequencial procedure to run an experiment then you are probably better of writing a python function which does the job plain and simple.
One reason to write a macro as a class is if, for example, you want to extend
the behaviour of the mv macro. In
this case, probably you would want to extend the existing macro by writing
your own macro class which inherits from the original macro and this way
benefit from most of the functionallity already existing in the original macro.
What should and should not be a macro
The idea of a macro is simply a piece of Python code that can be executed from control system interface (GUI/CLI). Therefore, anything that you don’t need to be executed by the interface should NOT be a macro.
When you have a big library of functions and classes, the approach to expose them to sardana should be to first carefully decide which procedures should be invoked by a GUI/CLI (namely the name of the procedure, which parameters it should receive and if it returns any value). Then write the macro(s) which invoke the code of the original library (see Using external python libraries). Avoid the temptation to convert the functions/classes of the original library into macros because:
This will most certainly break your code (any code that calls a function or class that has been converted to a macro will fail)
It will excessively polute the macro list (imagine a GUI with a combo box to select which macro to execute. If you have hundreds of macros it will take forever to find the one to execute even if they are in alphabetical order)
How to start writing a macro
Since macros are essencially Python code, they reside inside a Python file. In sardana, we call a Python file which contains macros a macro library.
At the time of writing, the easiest way to create a new macro is from spock (we are currently working on a macro editor GUI).
Preparing your text editor
Before launching spock it is important to decide which text editor you will use
to write your macros. Unless configured otherwise, spock will use the editor
specified by the system environment variable EDITOR. If this variable
is not set, it will default to vi under Linux/Unix and to notepad under
Windows. The following line explains how to set the EDITOR
environment variable to gedit under linux using bash shell:
$ export EDITOR=gedit
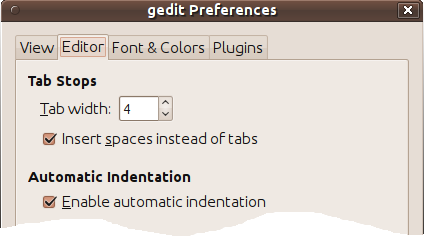
If you choose gedit it is important to properly configure it to write Python code:
Go to and select:
Tab width : 4
Insert spaces instead of tabs
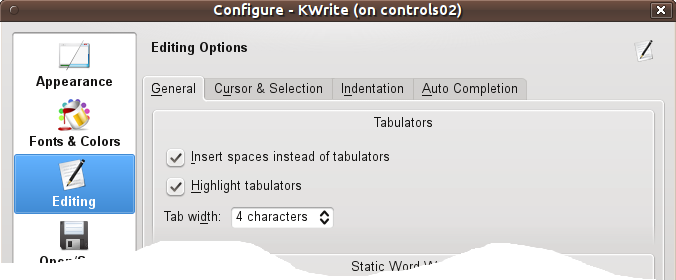
If you choose kwrite it is important to properly configure it to write Python code:
Go to and choose Editing:
- In General tab:
Tab width : 4
Insert spaces instead of tabulators
- In Indentation tab:
Default indentation mode : Python
Indentation width : 4
Now you are ready to start writing your macro! Type spock on the command
line. Once you are in spock, you can use the
edmac to create/edit macros. Let’s
say you want to create a new macro called hello_world in a new macro library
called salute. Just type in:
LAB-01-D01 [1]: edmac hello_world salute
Opening salute.hello_world...
Editing...
This will bring your favorite editor to life with a macro function template code for the macro hello_world.
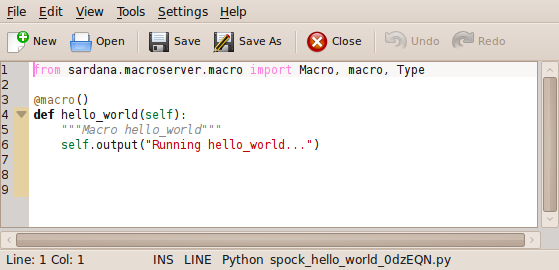
The next chapter will explain how to fill this template with useful code. After you finish editing the macro, save the file, exit the editor and go back to spock. You’ll be asked if you want the new code to be load on the server. Just answer ‘y’.
LAB-01-D01 [1]: edmac hello_world salute
Openning salute.hello_world...
Editing...
Do you want to apply the new code on the server? [y] y
The macro will be saved on the folder: <sardana path>/macroserver/macros/ [1]
Writing a macro function
As mentioned before, macros are just simple Python functions which have been labeled as macros. In Python, these labels are called decorators. Here is the macro function version of Hello, World!:
1from sardana.macroserver.macro import macro
2
3@macro()
4def hello_world(self):
5    """This is a hello world macro"""
6    self.output("Hello, World!")
- line 1
imports the macro symbol from the sardana macro package.
sardana.macroserver.macrois the package which contains most symbols you will require from sardana to write your macros.- line 3
this line decorates de following function as a macro. It is crucial to use this decorator in order for your function to be recognized by sardana as a valid macro.
- line 4
this line contains the hello_world function definition. Every macro needs at least one parameter. The first parameter is the macro execution context. It is usually called
selfbut you can name it anything. This parameter gives you access to the entire context where the macro is being run. Through it, you’ll be able to do all sorts of things, from sending text to the output to ask for motors or even execute other macros.- line 5
Documentation for this macro. You should always document your macro!
- line 6
this line will print Hello, World! on your screen.
Note
If you already know a little about Python your are probably wondering why
not use print("Hello, World!")?
Remember that your macro will be executed by a Sardana server which may be
running in a different computer than the computer you are working on.
Executing a normal print would just print the text in the server.
Therefore you need to explicitly say you want the text on the computer you
are working and not the server. The way to do it is using
output() instead of print.
If you prefer, you can use the context version of Python print()
function (it is a bit more powerful than
output(), and has a slightly
different syntax)
1from sardana.macroserver.macro import macro
2
3@macro()
4def hello_world(self):
5    """This is an hello world macro"""
6    self.print("Hello, World!")
The following footnote describes how to discover your Python version [2].
Remeber that a macro is, for all purposes, a normal Python function.
This means you CAN inside a macro write ANY valid Python code. This
includes for and while loops, if …
elif … else conditional execution, etc…
1import numpy.fft
2
3@macro()
4def fft_my_wave(self):
5    wave_device = self.getDevice("sys/tg_test/1")
6    wave = wave_device.wave
7    wave_fft = numpy.fft.fft(wave)
Adding parameters to your macro
Standard Python allows you to specify parameters to a function by placing comma
separated parameter names between the () in the function definition. The
macro API, in adition, enforces you to specify some extra parameter
information. At first, this may look like a useless complication, but you will
apreciate clear benefits soon enough. Here are some of them:
error prevention: a macro will not be allowed to run if the given parameter if of a wrong type
CLIs like Spock will be able to offer autocomplete facilities (press <tab> and list of allowed parameters show up)
GUIs can display list of allowed parameter values in combo boxes which gives increased usability and prevents errors
Documentation can be generated automatically
So, here is an example on how to define a macro that needs one parameter:
@macro([["moveable", Type.Moveable, None, "moveable to get position"]])
def where_moveable(self, moveable):
    """This macro prints the current moveable position"""
    self.output("%s is now at %s", moveable.getName(), moveable.getPosition())
Here is another example on how to define a macro that needs two parameters:
Moveable (motor, pseudo motor)
Float (motor absolute position to go to)
1from sardana.macroserver.macro import macro, Type
2
3@macro([ ["moveable", Type.Moveable, None, "moveable to move"],
4         ["position", Type.Float, None, "absolute position"] ])
5def move(self, moveable, position):
6    """This macro moves a moveable to the specified position"""
7    moveable.move(position)
8    self.output("%s is now at %s", moveable.getName(), moveable.getPosition())
The parameter information is a list of lists. Each list
being a composed of four elements:
parameter name
parameter type
- parameter default value:
Nonemeans no default value
Optionalmeans that the parameter value is optionalparameter description
Here is a list of the most common allowed parameter types:
Integer: an integer number
Float: a real number
Boolean: a boolean True or False
String: a string
Moveable: a moveable element (motor, pseudo-motor)
Motor: a pure motor
ExpChannel: an experimental channel (counter/timer, 0D, pseudo-counter, …)
Controller: a controller
ControllerClass: an existing controller class plugin
MacroCode: a macro
MeasurementGroup: a measurement group
Any: anything, really
The complete list of types distributed with sardana is made up by these five
simple types: Integer, Float, Boolean, String, Any, plus
all available sardana interfaces (Interface)
Optional parameters
A special parameter default value is the Optional keyword. A parameter
whose default value is set to Optional behaves just as one with a default
value, except that if the user does not provide a value explicitly, the
handling of its value is deferred to the run method (which gets None as
the parameter value). This allows for more complex handling of the value
(e.g. interactive prompting to the user, system introspection, reading from
files, etc.)
So, here is an example how to define and use the optional parameter:
 1from sardana.macroserver.macro import Macro, Type, Optional
 2
 3class count(Macro):
 4
 5    param_def = [
 6        ['itime', Type.Float, 1, 'integration time'],
 7        ['mntgrp', Type.MeasurementGroup, Optional, 'MntGrp to use']
 8    ]
 9
10    def run(self, itime, mntgrp):
11        bkp_active_mntgrp = None
12        try:
13            if mntgrp is not None:
14                bkp_active_mntgrp = self.getEnv('ActiveMntGrp')
15                mntgrp_name = mntgrp.name
16                self.setEnv('ActiveMntGrp', mntgrp_name)
17            self.info('Use "{0}" measurement group'.format(mntgrp_name))
18            self.ct(itime)
19        finally:
20            if bkp_active_mntgrp is not None:
21                self.setEnv('ActiveMntGrp', bkp_active_mntgrp)
Repeat parameters
A special parameter type is the repeat parameter (a.k.a. ParamRepeat,
originating from the ParamRepeat class which usage is deprecated).
The repeat parameter type is a list of parameter members. It is possible to
pass from zero to multiple repetitions of the repeat parameter items at the
execution time.
The repeat parameter definition allows to:
restrict the minimum and/or maximum number of repetitions
nest repeat parameters inside of another repeat parameters
define multiple repeat parameters in the same macro
Repeat parameter values are passed to the macro function in the form of a list. If the repeat parameter definition contains just one member it is a plain list of items.
1@macro([["moveables", [
2             ["moveable", Type.Moveable, None, "moveable to get position"]
3             ],
4             None, "list of moveables to get positions"]])
5def where_moveables(self, moveables):
6    """This macro prints the current moveables positions"""
7    for moveable in moveables:
8        self.output("%s is now at %s", moveable.getName(), moveable.getPosition())
But if the repeat parameter definition contains more than one member each item is an internal list of the members.
 1@macro([["m_p_pairs", [
 2             ["moveable", Type.Moveable, None, "moveable to be moved"],
 3             ["position", Type.Float, None, "absolute position"]
 4             ],
 5             None, "list of moveables and positions to be moved to"]])
 6def move_multiple(self, m_p_pairs):
 7    """This macro moves moveables to the specified positions"""
 8    for moveable, position in m_p_pairs:
 9        moveable.move(position)
10        self.output("%s is now at %s", moveable.getName(), moveable.getPosition())
A set of macro parameter examples can be found here.
Returning a macro result
A macro can produce one or more results to be returned. The macro API enforces to specify certain information about these result values. Here’s an example of how to define and return the results:
 1class twice(Macro):
 2  """A macro that returns its input and twice its input."""
 3
 4  param_def = [ [ "value", Type.Float, 23, "value to be doubled" ] ]
 5  result_def = [ [ "input_value", Type.Float, None, "the input value" ],
 6  [ "result", Type.Float, None, "the double of the given value" ] ]
 7
 8  def run(self, n):
 9      ret = 2*n
10      return n, ret
If a macro with a result is called from another macro the results can be retrieved as shown in this example:
 1class get_result(Macro):
 2  """Different ways of getting the result of a macro"""
 3
 4  def run(self):
 5
 6      value = self.runMacro("twice 2")
 7      self.output(value)
 8
 9      mymacro, pars= self.createMacro("twice 1")
10      value = self.runMacro(mymacro)
11      self.output(value)
12
13      value = self.execMacro("twice 1")
14      self.output(value.getResult())
15
16      value = self.twice(1)
17      self.output(value.getResult())
Macro context
One of the most powerfull features of macros is that the entire context of
sardana is at your disposal. Simply put, it means you have access to all
sardana elements by means of the first parameter on your macro (you can give
this parameter any name but usually, by convention it is called self).
self provides access to an extensive catalog of functions you can use in
your macro to do all kinds of things, among others, to obtain the sardana
elements. The Macro API reference describes all
these functions and the
Sardana-Taurus model API reference
describes the obtained sardana elements.
Let’s say you want to write a macro that explicitly moves a known theta motor to a certain position. You could write a macro which receives the motor as parameter but that would be a little silly since you already know beforehand which motor you will move. Instead, a better solution would be to ask sardana for a motor named “theta” and use it directly. Here is how you can acomplish that:
1@macro([["position", Type.Float, None, "absolute position"]])
2def move_theta(self, position):
3    """This macro moves theta to the specified position"""
4    th = self.getMotor("th")
5    th.move(position)
6    self.output("Motor ended at %s", moveable.getPosition())
Calling other macros from inside your macro
One of the functions of the macro decorator is to pass the knowledge of all existing macros to your macro. This way, without any special imports, your macro will know about all other macros on the system even if they have been written in other files.
Lets recreate the two previous macros (where_moveable and move) to execute
two of the macros that exist in the standard macro catalog
(wm and
mv)
Here is the new version of where_moveable
@macro([["moveable", Type.Moveable, None, "moveable to get position"]])
def where_moveable(self, moveable):
    """This macro prints the current moveable position"""
    self.wm([moveable]) # self.wm(moveable) backwards compatibility - see note
… and the new version of move
1@macro([ ["moveable", Type.Moveable, None, "moveable to move"],
2         ["position", Type.Float, None, "absolute position"] ])
3def move(self, moveable, position):
4    """This macro moves a moveable to the specified position"""
5    self.mv([moveable, position]) # self.mv(moveable, position) backwards compatibility - see note
6    self.output("%s is now at %s", moveable.getName(), moveable.getPosition())
Note
Both wm and
mv
use repeat parameters.
From Sardana 2.0 the repeat parameter values must be passed as lists of
items. An item of a repeat parameter containing more than one member is a
list. In case when a macro defines only one repeat parameter
and it is the last parameter, for the backwards compatibility reasons, the
plain list of items’ members is allowed.
Accessing Macro Environment
Macro Environment is a global space to store variables accessible from any macro.
The value of an existing environment variable can be accessed using
getEnv(). Setting the value of an environment variable is done
with setEnv().
For example, we know the ascan macro increments a ScanID environment
variable each time it is executed. The following example executes a scan and
outputs the new ScanID value:
1@macro([["moveable", Type.Moveable, None, "moveable to get position"]])
2def fixed_ascan(self, moveable):
3    """This does an ascan starting at 0 ending at 100, in 10 intervals
4    with integration time of 0.1s"""
5
6    self.ascan(moveable, 0, 100, 10, 0.1)
7    scan_id = self.getEnv('ScanID')
8    self.output("ScanID is now %d", scan_id)
Logging
The Macro API includes a set of methods that allow you to write log messages with different levels:
As you’ve seen, the special output() function has the same effect
as a print function (with slightly different arguments).
Log messages may have several destinations depending on how your sardana server
is configured. At least, one destination of each log message is the client(s)
(spock, GUI, other) which are connected to the server. Spock, for example,
handles the log messages by printing to the console with different colours. By
default, spock prints all log messages with level bigger than
debug() (You can change this behaviour by typing debug on in
spock). Another typical destination for log messages is a log file.
Here is an example on how to write a logging information message:
1@macro()
2def lets_log(self):
3    self.info("Starting to execute %s", self.getName())
4    self.output("Hello, World!")
5    self.info("Finished to executing %s", self.getName())
See also
Macro Logging and Reports for logging into file configuration.
By default the messages can be only composed from characters supported by the Latin1 encoding.
You could use other encodings e.g. UTF-8 encoding by changing the LOG_MESSAGE_CODEC.
Reports
Once the report facility has been properly configured, report messages can be sent to the previously configured report file.
There are several differences between reporting and logging. The first difference is that log messages may or may not be recorded, depending on the configured filters on the target (example: log file). A report will always be recorded.
Another difference is that report messages are not sent to the clients. The idea of a report is to silently record in a file that something as happened.
A third difference is that unlike logs, reports have no message level associated to them (actually since internally the log library is used to report messages, every report record as the predefined level INFO but this is just an implementation detail).
A report message can be emited at any time in the macro using the
report() method:
@macro()
def lets_report(self):
    self.report("this is an official report of macro '%s'", self.getName())
This would generate the following report message in the report file:
INFO 2012-07-18 09:39:34,943: this is an official report of macro ‘lets_report’
See also
Macro Logging and Reports for file reports configuration.
Advanced macro calls
As previously explained (see calling macros), you can use the Macro API to call other macros from inside your own macro:
1@macro([["moveable", Type.Moveable, None, "moveable to get position"]])
2def fixed_ascan(self, moveable):
3    """This does an ascan starting at 0 ending at 100, in 10 intervals
4    with integration time of 0.1s"""
5    self.ascan(moveable, 0, 100, 10, 0.1)
An explicit call to execMacro() would have the same effect:
1@macro([["moveable", Type.Moveable, None, "moveable to get position"]])
2def fixed_ascan(self, moveable):
3    """This does an ascan starting at 0 ending at 100, in 10 intervals
4    with integration time of 0.1s"""
5    self.execMacro('ascan', moveable, '0', '100', '10', '0.2')
The advantage of using execMacro() is that it supports passing
parameters with different flavors:
parameters as strings:
self.execMacro('ascan', motor.getName(), '0', '100', '10', '0.2')
self.execMacro('mv', [[motor.getName(), '0']])
self.execMacro('mv', motor.getName(), '0') # backwards compatibility - see note
parameters as space separated string:
1self.execMacro('ascan %s 0 100 10 0.2' % motor.getName())
2self.execMacro('mv [[%s 0]]' % motor.getName())
3self.execMacro('mv %s 0' % motor.getName()) # backwards compatibility - see note
4self.execMacro('mv [[%s 0][%s 20]]' % (motor.getName(), motor2.getName()))
5self.execMacro('mv %s 0 %s 20' % (motor.getName(), motor2.getName())) # backwards compatibility - see note
parameters as concrete types:
self.execMacro(['ascan', motor, 0, 100, 10, 0.2])
self.execMacro(['mv', [[motor, 0]]])
self.execMacro(['mv', motor, 0]) # backwards compatibility - see note
Note
Macro mv
use repeat parameters.
From Sardana 2.0 the repeat parameter values must be passed as lists of
items. An item of a repeat parameter containing more than one member is a
list.
In case when a macro defines only one repeat parameter
and it is the last parameter, for the backwards compatibility reasons, the
plain list of items’ members is allowed.
Accessing macro data
Sometimes it is desirable to access data generated by the macro we just called.
For these cases, the Macro API provides a pair of low level methods
createMacro() and runMacro() together with
data().
Let’s say that you need access to the data generated by a scan. First you call
createMacro() with the same parameter you would give to
execMacro(). This will return a tuple composed from a macro object
and the result of the prepare() method. Afterward you call runMacro() giving
as parameter the macro object returned by createMacro().
In the end, you can access the data generated by the macro
using data():
 1@macro([["moveable", Type.Moveable, None, "moveable to get position"]])
 2def fixed_ascan(self, moveable):
 3    """This runs the ascan starting at 0 ending at 100, in 10 intervals
 4    with integration time of 0.1s"""
 5
 6    ret = self.createMacro('ascan', moveable, '0', '100', '10', '0.2')
 7    # createMacro returns a tuple composed from a macro object
 8    # and the result of the Macro.prepare method
 9    my_scan, _ = ret
10    self.runMacro(my_scan)
11    self.print(len(my_scan.data))
A set of macro call examples can be found here.
Writing a macro class
This chapter describes an advanced alternative to writing macros as Python classes. If words like inheritance, polimorphism sound like a lawyer’s horror movie then you probably should only read this if someone expert in sardana already told you that the task you intend to do cannot be accomplished by writing macro functions.
The simplest macro class that you can write MUST obey the following rules:
The run() method is the place where you write the code of your
macro. So, without further delay, here is the Hello, World! example:
1from sardana.macroserver.macro import Macro
2
3class HelloWorld(Macro):
4    """Hello, World! macro"""
5
6    def run(self):
7        self.print("Hello, World!")
Let’s say you want to pass an integer parameter to your macro. All you have to
do is declare the parameter by using the param_def Macro member:
1from sardana.macroserver.macro import Macro, Type
2
3class twice(Macro):
4    """Macro twice. Prints the double of the given value"""
5
6    param_def = [ [ "value", Type.Float, None, "value to be doubled" ] ]
7
8    def run(self, value):
9        self.output(2*value)
Note
As soon as you add a param_def you also need to
modify the run() method to support the new paramter(s).
A set of macro parameter examples can be found here.
Preparing your macro for execution
Additionaly to the run() method, you may write a
prepare() method where you may put code to prepare the macro for
execution (for example, checking pre-conditions for running the macro). By
default, the prepare method is an empty method. Here is an example on how to
prepare HelloWorld to run only after year 1989:
 1import datetime
 2from sardana.macroserver.macro import Macro
 3
 4class HelloWorld(Macro):
 5    """Hello, World! macro"""
 6
 7    def prepare(self):
 8        if datetime.datetime.now() < datetime.datetime(1990,01,01):
 9            raise Exception("HelloWorld can only run after year 1989")
10
11    def run(self):
12        self.print("Hello, World!")
Handling macro stop and abort
While macro is being executed the user has a possibility to stop or abort it at any time. The way of performing this operation may vary between the client application being used, for example see Stopping macros in Spock.
It may be desired to stop or abort objects in use when the macro
execution gets interrupted. This does not need to be implemented by
each of the macros. One simply needs to use a special API to reserve
this objects in the macro context and the magic will happen to stop or abort
them when needed. For example if you get an object using the
getObj() method it is automatically
reserved. It is also worth mentioning the difference between the
getMotion() and
getMotor() methods. The first one
will reserve the moveable while the second will not.
And of course we need to clarify the difference between the stop and the abort operations. It is commonly agreed that stop is more gentle and respectful than abort and is supposed to bring the system to a stable state according to a particular protocol and respecting a nominal configuration e.g. stop motors respecting the nominal deceleration time. While abort is foreseen for more emergency situations and is supposed to bring the system to a stable state as fast as possible e.g. stop motors instantly, possibly loosing track of position.
While the reserved objects are stopped or aborted immediately after user’s
interruption, the macro execution is not. The macro will not stop until its
execution thread encounters the next Macro API call e.g.
output() or
getMotor(). There is also a special
method checkPoint() that does nothing
else but mark this place in your code as suitable for stopping or aborting.
If you want to execute a special procedure that should be executed in case
of user’s interruption you must override the
on_stop() or
on_abort() methods.
Important
Historically, it was not safe to use any of the
Macro API
calls after the macro was stopped/aborted. But this is fixed since
the 3.3.3 version including the possibility to execute new macros during
the macro stopping (but not aborting) process. Interrupting this newly
started macro should be done by issuing directly the abort command so the
whole stopping process will be switched to the aborting process.
Important
Using python’s time.sleep() will suspend macro execution
in a way it will not be possible to stop or abort it.
Because of that it is highly unrecommended. Instead,
you can use the standard macro sleep
which creates checkpoints and allows stopping and aborting the macro.
Handling exceptions
Please refer to the Python Errors and Exceptions documentation on how to deal with exceptions in your macro code.
Important
Handling macro stop and abort is internally implemented
using Python exceptions. So, your except clause can not simply catch any
exception type without re-raising it - this would ignore the macro stop/abort
request done in the try ... except block. If you still would like to
use the broad catching, you need to catch and raise the stop/abort exception
first:
 1import time
 2
 3from sardana.macroserver.macro import macro, StopException
 4
 5@macro()
 6def exception_macro(self):
 7    self.output("Starting stoppable process")
 8    try:
 9        for i in range(10):
10            self.output("In iteration: {}".format(i))
11            time.sleep(1)
12    except StopException:
13        raise
14    except Exception:
15        self.warning("Exception, but we continue")
16    self.output("After 'try ... except' block")
If you do not program lines 12-13 and you stop your macro within
the try ... except block then the macro will continue and print the
output from line 16.
You may choose to catch and re-raise:
StopException,
AbortException or
InterruptException. The last one will
take care of stopping and aborting at the same time.
Adding hooks support
Your macros may accept to attach an arbitrary code, a simple Python callable or even another macro, that will be executed at given places. In Sardana this code are called hooks, and the places are called hook places.
In order to allow attaching hooks to your macro you must write you
macro as a class while at the same time
inheriting from the Hookable class.
The hook places can be defined in the hints class member dictionary with
the allowsHooks key and a tuple of strings with the hook places
identifiers:
 1class hookable_macro(Macro, Hookable):
 2    """A macro that accepts and executes hooks."""
 3
 4    hints = {"allowsHooks": ("hook-place", "another-hook-place")}
 5
 6    def run(self):
 7        for hook in self.getHooks("hook-place"):
 8            hook()
 9        self.info("In between hook places")
10        for hook in self.getHooks("another-hook-place"):
11            hook()
Hooks can be programmatically attached to a macro before its execution either
using the hooks property or
using the appendHook() method:
 1def hook_function():
 2    pass
 3
 4class wrapping_macro(Macro):
 5    """A wrapping macro that attaches hooks to a hookable macro
 6    and executes it."""
 7
 8    def run(self):
 9        hookable_macro, _ = self.createMacro("hookable_macro")
10        hook_macro = ExecMacroHook(self, "mv", [["mot01", 1]])
11        hookable_macro.hooks = [(hook_macro, ["hook-place"])]
12        hookable_macro.appendHook((hook_function, ["another-hook-place"]))
13        self.runMacro(hookable_macro)
Note
Be aware of the following difference between setting the
hooks property and using the
appendHook() method.
Setting the property applies all hooks at once but may override
general hooks eventually attached to
the macro. Using the method appends just one hook but does not affect
the general hooks eventually attached to the macro.
Accessing Tango from your macros
Your macros almost certainly will need to access Tango devices, either external, for example, coming from the vacuum system or any other arbitrary system integrated with Tango Device Server or internal to Sardana (Sardana elements are currently exported as Tango devices) e.g.: motors, measurement group, etc.
There exists different API to access to Tango devices.
First, to access Sardana elements it is recommended to use the Sardana
API: e.g.: getMoveable to obtain
any moveable (motor or pseudo motor),
getMeasurementGroup to obtain a measurement
group.
Note
By adding parameters to your macro you get the same objects as if you were using the above methods. Their classes are documented in: Sardana-Taurus model API reference
Any external Tango device could be accessed with Taurus (using
taurus.Device) or simply with PyTango (using tango.DeviceProxy).
Taurus gives you some benefits over PyTango:
seamless attribute configuration management e.g.: unit aware attribute read and write, simplified way to read/write attribute configuration, etc.
unique way to access different data sources e.g. Tango, EPICS, hdf5, etc.
simplified way to use Tango events
However the above benefits are not for free and more precisely are for some extra time overhead (in milliseconds range).
As a rule of thumb, if you you don’t mind the extra overhead and value the simplified usage you should use Taurus. If you strive for very optimal access to Tango and don’t need these benefits then most probably PyTango will work better for you.
Hint
If you go for PyTango and wonder if creating a new tango.DeviceProxy
in frequent macro executions is inefficient from the I/O point of view you
should not worry about it cause Tango (more precisely CORBA) is taking
care about recycling the connection during a period of 120 s (default).
If you still would like to optimize your code in order to avoid creation
of a new tango.DeviceProxy you may consider using the
functools.lru_cache as a singleton cache mechanism:
 1import functools
 2import tango
 3from sardana.macroserver.macro import macro
 4
 5Device = functools.lru_cache(maxsize=1024)(tango.DeviceProxy)
 6
 7@macro()
 8def switch_states(self):
 9    """Switch TangoTest device state"""
10    proxy = Device('sys/tg_test/1')
11    proxy.SwitchStates()
Here you don’t need to worry about the opened connection to the Tango device server in case you don’t execute the macro for a while. Again, Tango (more precisely CORBA) will take care about it. See more details about the CORBA scavanger thread in: Tango client threading and CORBA idle connection shutdown.
Using external python libraries
Macro libraries can use code e.g. call functions and instantiate classes defined by external python libraries. In order to import the external libraries inside the macro library, they must be available for the python interpreter running the Sardana/MacroServer server (see Running server).
This could be achieved in two ways:
Adding the directory containing the external library to the PythonPath property of the MacroServer tango device (path separators can be
\nor:).Adding the directory containing the external library to the PYTHONPATH OS environment variable of the Sardana/MacroServer process.
The external libraries can be reloaded at Sardana/MacroServer server
runtime using the rellib macro.
Plotting
Remember that your macro will be executed by a Sardana server which may be
running in a different computer than the computer you are working on. Executing
a normal plot (from matplotlib or guiqwt) would just try to show
a plot in the server machine. The macro API provides a way to plot
graphics from inside your macro whenver the client that runs the macro
understands the plot request (don’t worry, spock does understand!)
The plotting API is the same used by pyplot. The
API is accessible through the macro context (self). Here is an
example:
1import math
2from numpy import linspace
3from scipy.integrate import quad
4from scipy.special import j0
5
6from sardana.macroserver.macro import macro
7
8def j0i(x):
9 """Integral form of J_0(x)"""
10 def integrand(phi):
11 return math.cos(x * math.sin(phi))
12 return (1.0/math.pi) * quad(integrand, 0, math.pi)[0]
13
14@macro()
15def J0_plot(self):
16 """Sample J0 at linspace(0, 20, 200)"""
17 x = linspace(0, 20, 200)
18 y = j0(x)
19 x1 = x[::10]
20 y1 = list(map(j0i, x1))
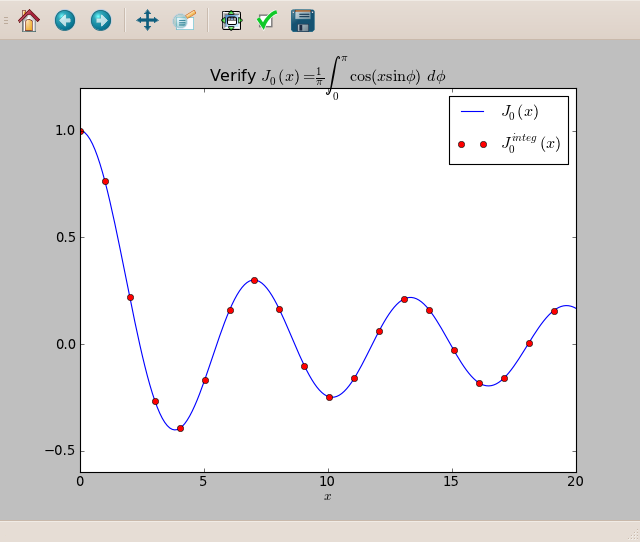
21 self.pyplot.plot(x, y, label=r'$J_0(x)$') #
22 self.pyplot.plot(x1, y1, 'ro', label=r'$J_0^{integ}(x)$')
23 self.pyplot.title(r'Verify $J_0(x)=\frac{1}{\pi}\int_0^{\pi}\cos(x \sin\phi)\,d\phi$')
24 self.pyplot.xlabel('$x$')
25 self.pyplot.legend()
26 self.pyplot.draw()
The last call to pyplot.draw() is important to ensure the client updates
the figure properly.
Running this macro from spock will result in something like:
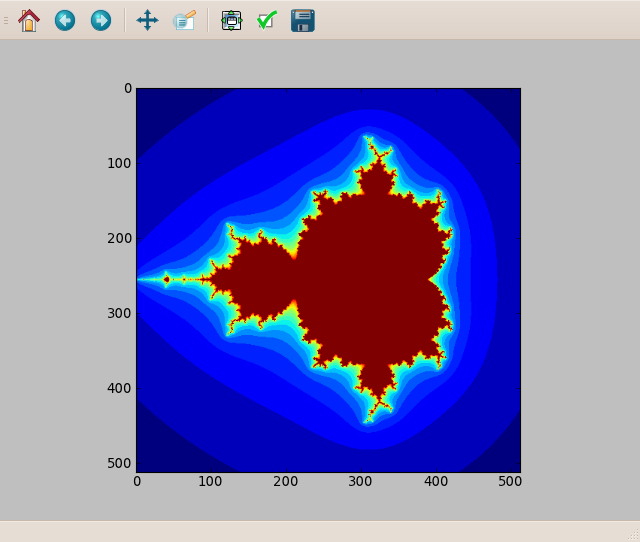
Just for fun, the following macro computes a fractal and plots it as an image:
 1import numpy
 2
 3@macro([["interactions", Type.Integer, None, ""],
 4        ["density", Type.Integer, None, ""]])
 5def mandelbrot(self, interactions, density):
 6
 7    x_min, x_max = -2, 1
 8    y_min, y_max = -1.5, 1.5
 9
10    x, y = numpy.meshgrid(numpy.linspace(x_min, x_max, density),
11                          numpy.linspace(y_min, y_max, density))
12
13    c = x + 1j * y
14    z = c.copy()
15
16    fractal = numpy.zeros(z.shape, dtype=numpy.uint8) + 255
17
18    finteractions = float(interactions)
19    for n in range(interactions):
20        z *= z
21        z += c
22        mask = (fractal == 255) & (abs(z) > 10)
23        fractal[mask] = 254 * n / finteractions
24    self.pyplot.imshow(fractal)
25    self.pyplot.draw()
And the resulting image (interactions=20, density=512):
A set of macro plotting examples can be found here.
Known plotting limitations
When you plot from inside a macro with self.pyplot.plot, the sardana server
will “ask” spock to execute the desired function with the given parameters.
This means that the result of plotting (a sequence of
Line2D) is not available in the sardana server (since
the actual line is in spock). The result of any function call in
self.pyplot will always be None!
This means that the following code which works in a normal IPython console will NOT work inside a macro:
LAB-01-D01 [1]: line = plot(range(10))[0]

LAB-01-D01 [2]: line.set_linewidth(5)
Also consider that each time you plot the complete data to be plotted is sent from the server to the client… so please avoid plotting arrays of 10,000,000 points!
Clients like spock receive the requests to plot in a separate thread.
Matplotlib has a long history of issues concerning plot updates using different
threads. To mitigate these effects please be sure to call self.pyplot.draw()
on your macro every time you need to be sure the matplotlib figure is up to date.
Asking for user input
It is possible to ask for user input inside a macro.
Hint
Asking for input in the middle of long macros will cause the macro to stop and wait for user input. If you write a long macro that might be executed in the middle of the night please take the appropriate steps to make sure you don’t arrive in the morning and you are faced with a message box waiting for you to answer a question that could be avoided with a proper default value. To make sure your macro can run in unattended mode make sure that:
it implements the interactive interface
every
input()gives a default_value keyword argument
(read on to see how to meet these requirements)
In pure Python, to ask for user input you can use the raw_input() (Python
2) / input() (Python 3)
>>> answer = raw_input('--> ')
--> Monty Python's Flying Circus
>>> answer
"Monty Python's Flying Circus"
The Macro API provides a much more powerful version of
input() since it can accept a wide variaty of options.
Similar to what happens with Plotting, when input is requested from inside a macro, the question will be sent to the client (example: spock) which ordered the macro to be executed. At this time the macro is stopped waiting for the client to answer. The client must “ask” the user for a proper value and the answer is sent back to the server which then resumes the macro execution.
Asking for user input is straightforward:
1@macro()
2def ask_name(self):
3    """Macro function version to ask for user name"""
4
5    answer = self.input("What's your name?")
6    self.output("So, your name is '%s'", answer)
Executing this macro will make spock popup an Input Dialog Box like this one:

When you type your name and press OK the macro finishes printing the output:
LAB-01-D01 [1]: ask_name
Non interactive macro 'ask_name' is asking for input (please set this macro interactive to True)
So, your name is 'Homer Simpson'
The macro prints a warning message saying that the macro was not declared as
interactive. All macros that request user input should be declared as
interactive. This is because the sardana server can run a macro in unattended
mode. When an interactive macro is run in unattended mode, all
input() instructions that have a default value will return
automatically the default value without asking the user for input.
To declare a macro as interactive set the interactive
keyword argument in the macro decorator to True
(default value for interactive is False), like this:
1@macro(interactive=True)
2def ask_name(self):
3    """Macro function version to ask for user name"""
4
5    answer = self.input("What's your name?")
6    self.output("So, your name is '%s'", answer)
To declare a macro class as interactive set the interactive member to
True (default value for interactive is False), like this:
1class ask_name(Macro):
2    """Macro class version to ask for user name"""
3
4    interactive = True
5
6    def run(self):
7        answer = self.input("What's your name?")
8        self.output("So, your name is '%s'", answer)
a helper imacro decorator and a iMacro class exist which can
be used instead of the macro decorator and Macro class to
transparently declare your macro as interactive:
 1from sardana.macroserver.macro import imacro, iMacro
 2
 3# interactive macro function version
 4
 5@imacro()
 6def ask_name(self):
 7    """Macro function version to ask for user name"""
 8
 9    answer = self.input("What's your name?")
10    self.output("So, your name is '%s'", answer)
11
12# interactive macro class version
13
14class ask_name(iMacro):
15    """Macro class version to ask for user name"""
16
17    def run(self):
18        answer = self.input("What's your name?")
19        self.output("So, your name is '%s'", answer)
The following sub-chapters explain the different options available for macro user input.
Specifying input data type
The default return type of input is str which mimics the
pure Python input function. However, often you want to restrict the user input
to a specific data type like Integer, Float or even complex object like
Moveable or to a list of possible options.
The macro input API provides an easy way to do this by
specifying the concrete data type in the
keyword argument data_type. The following examples
shows how to ask for an Integer, a Moveable, and single/multiple
selection from a list of options:
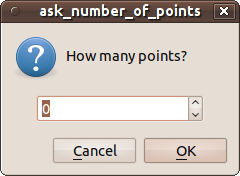
1from sardana.macroserver.macro import imacro, Type
2
3@imacro()
4def ask_number_of_points(self):
5 """asks user for the number of points"""
6
7 nb_points = self.input("How many points?", data_type=Type.Integer)
8 self.output("You selected %d points", nb_points)
9
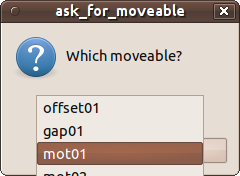
10@imacro()
11def ask_for_moveable(self):
12 """asks user for a motor"""
13
14 moveable = self.input("Which moveable?", data_type=Type.Moveable)
15 self.output("You selected %s which is at %f", moveable, moveable.getPosition())
16
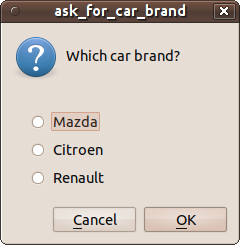
17@imacro()
18def ask_for_car_brand(self):
19 """asks user for a car brand"""
20
21 car_brands = "Mazda", "Citroen", "Renault"
22 car_brand = self.input("Which car brand?", data_type=car_brands)
23 self.output("You selected %s", car_brand)
24
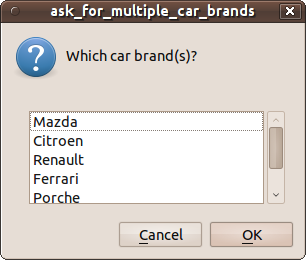
25@imacro()
26def ask_for_multiple_car_brands(self):
27 """asks user for several car brands"""
28
29 car_brands = "Mazda", "Citroen", "Renault", "Ferrari", "Porche", "Skoda"
30 car_brands = self.input("Which car brand(s)?", data_type=car_brands,
31 allow_multiple=True)
32 self.output("You selected %s", ", ".join(car_brands))
… and these are the corresponding dialogs that will popup in spock:
Providing a default value
Providing a default value is very important since it will allow your macro to run in unattended mode. When given, the default_value keyword argument value type must be compatible with the data_type keyword argument. Providing a default value is easy. The following examples repeat the previous data type examples giving compatible default values:
 1from sardana.macroserver.macro import imacro, Type
 2
 3@imacro()
 4def ask_number_of_points(self):
 5    """asks user for the number of points"""
 6
 7    nb_points = self.input("How many points?", data_type=Type.Integer,
 8                           default_value=100)
 9    self.output("You selected %d points", nb_points)
10
11@imacro()
12def ask_for_moveable(self):
13    """asks user for a motor"""
14
15    moveable = self.input("Which moveable?", data_type=Type.Moveable,
16                          default_value="gap01")
17    self.output("You selected %s which is at %f", moveable, moveable.getPosition())
18
19@imacro()
20def ask_for_car_brand(self):
21    """asks user for a car brand"""
22
23    car_brands = "Mazda", "Citroen", "Renault"
24    car_brand = self.input("Which car brand?", data_type=car_brands,
25                           default_value=car_brands[1])
26    self.output("You selected %s", car_brand)
27
28@imacro()
29def ask_for_multiple_car_brands(self):
30    """asks user for several car brands. Default is every other car brand
31    in the list"""
32
33    car_brands = "Mazda", "Citroen", "Renault", "Ferrari", "Porche", "Skoda"
34    car_brands = self.input("Which car brand(s)?", data_type=car_brands,
35                            allow_multiple=True,
36                            default_value=car_brands[::2])
37    self.output("You selected %s", ", ".join(car_brands))
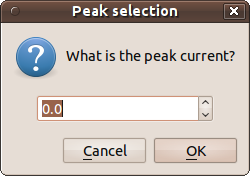
Giving a title
By default, the Dialog window title will contain the name of the macro which triggered user input. You can override the default behaviour with the keyword argument title:
1@imacro()
2def ask_peak(self):
3    """asks use for peak current of points with a custom title"""
4
5    peak = self.input("What is the peak current?", data_type=Type.Float,
6                      title="Peak selection")
7    self.output("You selected a peak of %f A", peak)
… and this is the corresponding dialog:
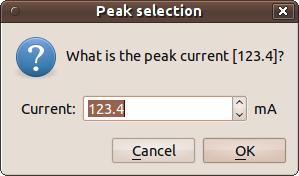
Specifying label and unit
The key and unit keyword arguments can be used to provide additional label and unit information respectively and prevent user mistakes:
 1@imacro()
 2def ask_peak_v2(self):
 3    """asks use for peak current of points with a custom title,
 4    default value, label and units"""
 5
 6    label, unit = "peak", "mA"
 7    peak = self.input("What is the peak current?", data_type=Type.Float,
 8                      title="Peak selection", key=label, unit=unit,
 9                      default_value=123.4)
10    self.output("You selected a %s of %f %s", label, peak, unit)
… and this is the corresponding dialog:
Limiting ranges, setting decimal places and step size
When numeric input is requested, it might be useful to prevent user input outside a certain range. This can be achieved with the minimum and maximum keyword arguments:
 1@imacro()
 2def ask_peak_v3(self):
 3    """asks use for peak current of points with a custom title,
 4    default value, label, units and ranges"""
 5
 6    label, unit = "peak", "mA"
 7    peak = self.input("What is the peak current?", data_type=Type.Float,
 8                      title="Peak selection", key=label, unit=unit,
 9                      default_value=123.4, minimum=0.0, maximum=200.0)
10    self.output("You selected a %s of %f %s", label, peak, unit)
An additional step keyword argument may help increase usability by setting the step size in a input spin box:
 1@imacro()
 2def ask_peak_v4(self):
 3    """asks use for peak current of points with a custom title,
 4    default value, label, units, ranges and step size"""
 5
 6    label, unit = "peak", "mA"
 7    peak = self.input("What is the peak current?", data_type=Type.Float,
 8                      title="Peak selection", key=label, unit=unit,
 9                      default_value=123.4, minimum=0.0, maximum=200.0,
10                      step=5)
11    self.output("You selected a %s of %f %s", label, peak, unit)
When asking for a decimal number, it might be useful to use the decimals keyword argument to indicate how many decimal places to show in a input spin box:
 1@imacro()
 2def ask_peak_v5(self):
 3    """asks use for peak current of points with a custom title,
 4    default value, label, units, ranges, step size and decimal places"""
 5
 6    label, unit = "peak", "mA"
 7    peak = self.input("What is the peak current?", data_type=Type.Float,
 8                      title="Peak selection", key=label, unit=unit,
 9                      default_value=123.4, minimum=0.0, maximum=200.0,
10                      step=5, decimals=2)
11    self.output("You selected a %s of %f %s", label, peak, unit)
A set of macro input examples can be found here.
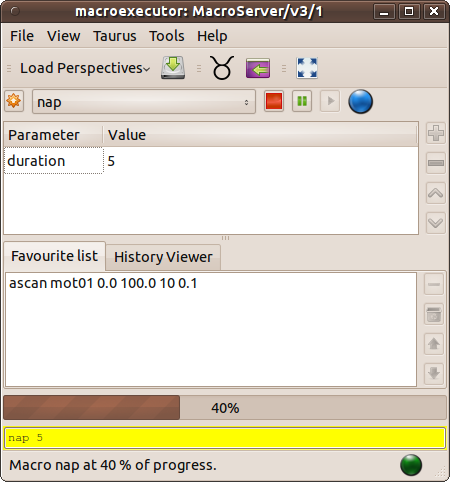
Showing progress in long macros
Some of the macros you write may take a long time to execute. It could be useful
to provide frequent feedback on the current progress of your macro to prevent
users from thinking the system is blocked. The way to do this is by
yielding a new progress number in the ode everytime you want to
send a progress.
The following code shows an example:
1import time
2
3@macro([["duration", Type.Integer, 1, "time to sleep (s)"]])
4def nap(self, duration):
5
6    fduration = float(duration)
7    for i in range(duration):
8        time.sleep(1)
9        yield (i+1) / fduration * 100
The important code here is line 9. Everytime the macro execution reaches this line of code, basically it tells sardana to send a progress with the desired value. By default, the value is interpreted has a percentage and should have the range between 0.0 and 100.0.
Actually, even if your macro doesn’t explicitly send macro progress reports, sardana always generates a 0.0 progress at the beginning of the macro and a last 100.0 progress at the end so for example, in a GUI, the progress bar showing the macro progress will always reach the end (unless an error occurs) no matter how you program the progress.
It is possible to generate a progress that doesn’t fit the 0 - 100.0 range. The above macro has been modified to send a progress with a customized range:
 1import time
 2
 3@macro([["duration", Type.Integer, 1, "time to sleep (s)"]])
 4def nap(self, duration):
 5
 6    status = { 'range' : [0, duration] }
 7
 8    fduration = float(duration)
 9    for i in range(duration):
10        time.sleep(1)
11        status['step'] = i+1
12        yield status
You may notice that this way, the range can be changed dynamically. A progress bar in a GUI is programmed to adjust not only the current progress value but also the ranges so it is safe to change them if necessary.
Simultaneous actions
There is a facility for parallel execution of operations within a macro. For the
motion and acquisition you can use the asynchronous methods from the
Motion and MeasurementGroup objects. For simultaneous execution
of any other tasks you can use the job manager.
When using this feature, you should keep a few things in mind:
The job execution may not start immediately, as this depends on a worker process availability (this is generally true also for the execution of the macro itself)
Exceptions raised in a job will not be catched, and therefore will not stop any reserved element; ideally you should implement your own exception handling inside a job
You should pay careful attention to synchronization between the jobs and the macro
Asynchronous motion and acquisition
You can move the motor asynchronously by using the Motion object:
1@macro([["mot", Type.Moveable, None, "moveable"],
2        ["pos", Type.Float, None, "position"]])
3def move_async(self, mot, pos):
4    motion = self.getMotion([mot])
5    _id = motion.startMove([pos])
6    self.info("The motion is now started.")
7    motion.waitMove(id=_id)
8    self.info("The motion has finished.")
In above example, the asynchronous movement is started using
Motion.startMove method and then it is synchronized using
Motion.waitMove. In between you can perform other operations, the
waitMove call will wait for the motion to finish or return immediately
if it’s already finished. startMove will return an identificator, that
can be later used to wait for the motion.
The MeasurementGroup provides a similar interface for asynchronous
acquisition:
 1@macro([["mg", Type.MeasurementGroup, None, "measurement group"],
 2        ["it", Type.Float, None, "integration time"]])
 3def acq_async(self, mg, it):
 4    mg.putIntegrationTime(it)
 5    mg.setNbStarts(1)
 6    mg.prepare()
 7    id_ = mg.startCount()
 8    self.info("The acquisition is now started.")
 9    mg.waitCount(id=_id)
10    self.info("The acquisition has finished.")
After the measurement group is configured for acquisition, you can start
asynchronous acquisition by using MeasurementGroup.startCount method. To
synchronize the acquisition use MeasurementGroup.waitCount. The usage is
analogous to asynchronous motion.
Take a look at the example macro libraries for some more examples.
Arbitrary asynchronous operations
There are two methods for asynchronous execution of arbitrary code. First one is to use the MacroServer’s job manager:
 1from threading import Event
 2
 3class async_attached(Macro):
 4    def _job(self):
 5        self.info("Doing something...")
 6        self._event.set()
 7
 8    def run(self):
 9        self._event = Event()
10        self.getManager().add_job(self._job)
11        self.info("The job is now running.")
12        self._event.wait(60)
13        self.output("The job has finished (or timeout occured).")
In the run method, first we create the Event object which will
be used for the synchronization. Then we get the manager object and add a job to
it. The job begins to run when added. When the job finishes, it sets the
Event to notify the macro. The macro waits for the event to become set.
Caution
If you do not wait for the job to finish, you are running in the “detached mode”. This is not recommended, as it requires more elaborated synchronization methods. Use at your own risk!
The second method is to use standard Python threading library.
Adding your macros to Sardana
To add your macros to Sardana, you need to configure the macro plugin discovery path (MacroPath property):
_MACRO_SERVER.put_property({"MacroPath":["<Your macro dir path>"]})
Note
You can add more than one path, but be careful! The path order is important. Macros in the higher position paths will take precedence over the lower position paths.
Footnotes